The vessels that became known as Liberty ships were designed as basic cargo carrying vessels, mass produced to meet the desperate needs of the war. The programme started in September of 1941 and by the end of the war some 2710 ships, built from the original British design, had been constructed. The design had many critics but there is no doubt that the success of the programme was a major contributor to the Allied victory. The design provided simple, fast construction (the record time from keel laying to launch was four days fifteen and a half hours for the Robert E Perry) and then speedy shipment of large bulk cargoes. The Byron Darnton was one of these ships.

She was launched from the Bethlehem Fairfields, Baltimore, USA on 16th December 1943 (Yard No 2296). Her dimensions were 441.0′ x 57.0′ x 27.0′ and her tonnae was 7176 gross tons, 4380 net tons. She was powered by a triple expansion steam engine by General Machine Corporation, Hamilton, Ontario. Managed by the US War Shipping Administration, she had a successful war career surviving voyages to Murmansk and the Phillipines.

In March 1946, under the management of Denholm and Co. Ltd. of Greenock, she departed Copenhagen for New York, via the Clyde, in ballast. She had on board fifteen passengers, including nine women, and a crew of thirty nine.
As Captain Robert King navigated his vessel round the Mull of Kintyre and into the Firth of Clyde on the evening of 16th March, the weather was foul with strong winds driving the heavy rain and sleet reducing the visibility to almost zero. It was 10:50pm and the passengers were settling themselves for their last evening aboard before the stop over at Greenock. Without warning there was a terrible grinding and tearing noise as the ship crashed onto Boiler Reef just below the lighthouse on the island of Sanda. There was no panic, as it was obvious that those aboard were in little immediate danger, but the crew fired distress flares as they feared that the ship could soon succumb to the pounding of the huge waves that were smashing into her starboard side. The flares were spotted by the coastguard at Southend who immediately called out the lifeboat from Campbeltown.


The lifeboat, Duke of Connaught, reached the scene later that night but was unable to approach in the darkness. She anchored in the sheltered lee north of the island of Sanda until dawn then came round to attempt the rescue. The vessel was lying in a very difficult position aground on the reef with her bow facing the lighthouse. She was lying along the reef with her port side facing to shore making access to that side for the lifeboat extremely dangerous. Her starboard side was being pounded by mountainous seas making any approach from the seaward side impossible. The lifeboat coxswain, Duncan Newlands, made three attempts to ease his small craft alongside the stricken ship between the towering walls of the hull, now heeling over dangerously towards the shore, and the treacherous rocks of the reef. On the third attempt he succeeded, taking off everyone on board some fourteen hours after the ship had run aground. The brave radio operator, who had stayed at his post continuously since the stranding, was the last to leave. Their adventure was not quite over for, as they sped north towards Campbeltown, the lifeboat engine flooded off Johnston’s Point and they had to proceed for the next five miles under sail. The engineer managed to deal with the problem and eventually the engines were restarted allowing them to reach Campbeltown safely.
The rescue had come just in time for only two hours later the ship broke in two forward of the bridge and her stern section started to slip off the reef. By the following day the two sections had slipped deeper into the water on opposite sides of the reef. The captain was able to board the stern section and salvage a few items of the passengers’ luggage but it had developed a severe list to starboard and would soon disappear beneath surface. The ship was to be heavily salvaged in the autumn of 1953 but until this time the bow section, lying on top of the reef, was to be a visible reminder of the loss of the Byron Darnton.
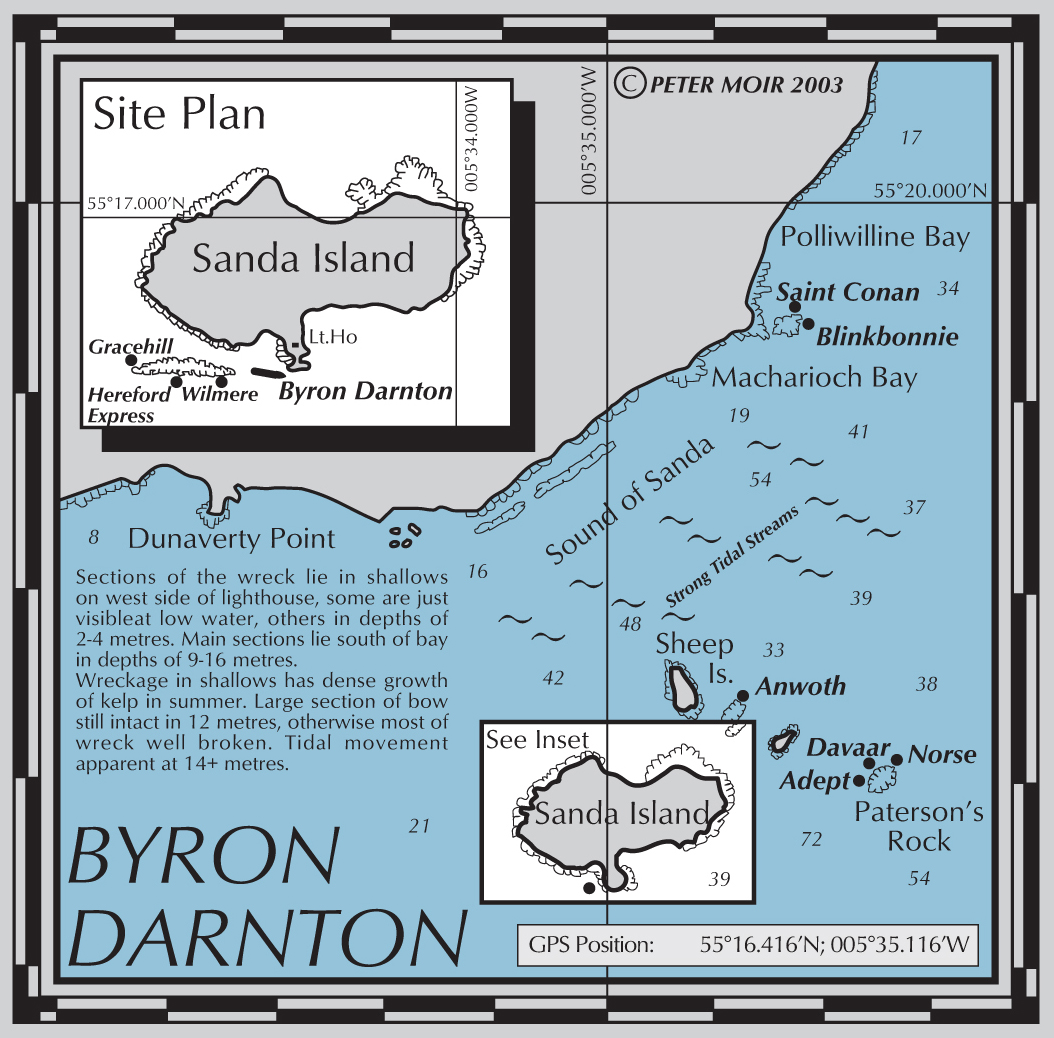
The remains of the Byron Darnton lie on the east end of Boiler Reef, Sanda in position 55°16.446’N, 005°35.147’W (WGS84). Due to the extensive salvage carried out the majority of the wreckage is unrecognisable although sizeable portions still remain. The bow section lies on top of the reef near the lighthouse about 100 metres from the shore and is visible above the surface at most states of the tide.


We’d also like to thank Iain Crosbie who provided one of the photographs of the Byron Darnton ashore on Boiler Reef.


